Wednesday, 23 April 2014

Banana Breakfast Bars


I've been meaning to blog this recipe.  My initial delay was in fine-tuning the recipe.  Many revisions and perfectly fine breakfast bars later, I still haven't uploaded the recipe.  My excuse this time was waiting to use the PC as I have only blogged on that.  Writing this on the laptop is rather free-flowing typing wise, not sure what the hold up was?

I used a basic flapjack recipe and hacked it to death!  I read about using bananas to make flapjacks healthier by reducing the fat content.  This also adds to the sweetness so sugar/syrup can be reduced accordingly.  The sunflower seeds give it a lovely toasted nutty flavour and it looks beautiful.  As if that wasn't enough, this is Vegan and gluten free!  You'll never have to throw overripe bananas away!

Ingredients:

70g corn oil (or 60ml)
60g sugar
3 dsp golden syrup  (I don't have a tablespoon!  Otherwise 2 TBSP!)
200g porridge oats
2 ripe medium bananas (about 220g - 270g gross)
a pinch of salt
50g soaked sultanas
30g sunflower seeds

Method:

1. Gently heat oil in large saucepan and sprinkle sugar in, add syrup. It should dissolve.

 
2. Turn off heat and pour in porridge oats (it will look very dry but don't worry!). Mash banana and add to porridge.  TIP: If you want to add a flavour e.g. mixed spice or cinnamon, add a tsp to the mashed banana.


3. Strain sultanas and add to mix. Place in tin.  I use a non-stick baking tin lined with baking paper. Lightly oil the sides of the tin.


4. Sprinkle evenly 30g sunflower seeds. I start edges first as I don't want them neglected. Lightly press in seeds.


5. Cut foil to cover the tin, it should be slightly smaller and squash down so there is thin layer of air but not touching

 
Fan oven 200 C for 20mins, then 5mins without the foil at 180 C, this is to brown the seeds.
I tend to switch oven off, have a look and close the door for another 5mins in the residual heat.
Let it cool in tin for a little. Then turn over and cool. Cut into how many you pieces you like. 10 bars is a good number for breakfast or 15/20 mini pieces for picnics.

ENJOY!!!

 
P.S once cool, wrap individually in cling film. They freeze a treat! Take out before work and eat by elevenses.


Review:
 
One of my staple recipes.  I enjoy eating these but they're better shared out.  I've baked them for picnics, house parties, bouldering sessions, when people leave.

Sunday, 30 June 2013

Hazelnut Brownies

Cut into 16 pieces

I love this chocolate brownie recipe!  Chocolate doesn't last long in this household!  I first heard of a cocoa powder recipe from reading a Food and Drink book written by the host Michael Barry.  Sadly, from Googling his name I found out he died in 2011.
I have made brownies many times varying the extra ingredient.  Prunes, and glacĂ© cherries in the centre work well!  This time, I used hazelnuts.  I chose to put them on the bottom so they wouldn't burn if I put them as a topping and I would still get that slightly underbaked (or perfectly baked) gooey centre.  These are lovely and chewy on the edges.
You can make these cow-free by using Pure spread.  They're not as decadent but still taste good!

Makes 16 Brownies

Ingredients:

100g Butter
40g Cocoa Powder (I use Green & Black's)
2 large Eggs
225g Sugar (I used caster sugar but you can make it more fudgey with the brown varieties)
1tsp Vanilla Extract (Omitted as I didn't have any but it does make it nicer)
Pinch of salt
50g Self Raising Flour
100g Hazelnuts (I used the snacking variety with skins on)

Method:

1. Melt the butter in a bowl in the microwave.  Use short blasts and keep an eye on it!  Add the cocoa powder and mix together.

Dark and brooding!

2. While the cocoa mixture is cooling, cream the eggs and sugar

Beat it in <2mins
Whizzy Whisk!


 I bought the Whizzy Whisk at a Foodies Festival.  They were £10 each or 2 for £15!  I was wondering if this was going to be one of those gadgets that you buy and don't use.  The demo was really good and I was sold!  This is the 2nd time I have used it!  This is a toil-free way of baking!  It works by using a plunging motion and the spring rotates the whisk end.

3.
Mix in the dark and brooding cocoa mixture


Add the Vanilla extract and pinch of salt.

4.

Hmmmmm!
Fold in the flour


5.   

Line your baking tray with Baking Parchment.  This is a silicone lined paper that makes it non-stick.  Pop your hazelnuts into the lined tray.  Preheat fan oven to 180C

6.


Ideally, you would pipe the mixture into the tray.  I don't bake enough to faff around with that!  I gently spooned blobs of the mixture into the tray.  This is to keep the hazelnuts spread out.  Once the mixture has been transferred from bowl to tray, smooth over with the back of the spoon.

Bake for 35mins but do check before that time.  You want a soft centre if possible.

Review:

These were good and very rich!  The corner pieces didn't have many hazelnuts.  Next time, I will put a whole layer of hazelnuts!  Buying the snacking hazelnut variety with the skins adds extra fibre.  They were good without the vanilla extract.


Tuesday, 8 January 2013

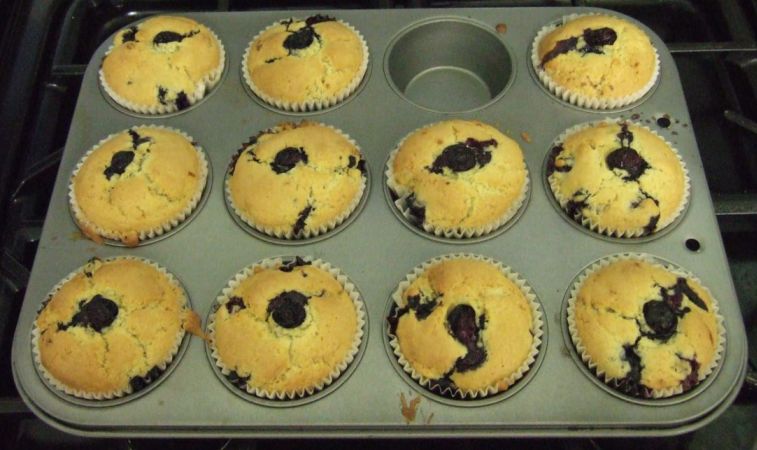
Blueberry and Orange Muffins


Traditionally it is lemon and blueberry muffins but I wanted to be different.  Muffins are simple and easy to make.

Makes 12 Muffins

Ingredients:

300g Self Raising Flour
100g Caster Sugar
1tsp Baking Powder
Pinch of Salt
175ml Soy Milk
125ml Corn Oil
1 Egg
The peel of 1 Orange, grated
150g - 200g Fresh Blueberries (plus 12 for decorating)

Method:

1.  Wash blueberries and let them dry.  Take 1 tsp flour and put to one side.
2.  Grate an orange and finely chop the zest.  I think using the zest setting releases too many oils and I prefer bigger bits of orange.

3.  I didn't sift my flour this time because my sieve was acting as a colander for my blueberries.  It didn't make much difference.  Great time saving tip!
Add baking powder, sugar and salt.  Stir thoroughly.

4.  Measure the milk and oil into a measuring jug, add egg and beat together. Add the orange peel.

5.  Fan oven on, heat to 170c.
Line the muffin tin with 2 paper cases for each hole.  In a bowl, mix the 1tsp flour with the blueberries.  Then tip this into the flour/sugar/salt/powder bowl.
When the oven is hot enough, you can mix the wet and dry ingredients together.  I did this by putting the liquid into a bowl and then tipping the dry ingredients.  Combine until just mixed, do not over-stir.

6.  Spoon evenly between cases.  Apply a blueberry on top.  Bake for 20-25mins.


Review:

I think orange worked well.  I will experiment with putting some of the juice into the muffin mix next time.  I love how the blueberries bleed, they create a gorgeous marbling effect on top.  The great thing about home baking is that it is custom made and this one is bursting with blueberries!


Sunday, 6 January 2013

Garlic and Rosemary Potato Wedges


 I have an abundance of potatoes to use up that I bought for the Christmas meal.  I wanted something moreish and simple.  I had cooked garlic and rosemary roast potatoes for Christmas and still had that fresh (or not quite as fresh) rosemary to use up.  I took out all the possible potato wedges seasonings from my cupboard.  These included: garlic salt, Cajun seasoning, oregano, rosemary, celery salt and chilli powder.  In the end, I settled on fresh rosemary and fresh garlic with salt & pepper.

The only bit of research I needed was the oven temperature and how long to bake them for.  Jamie Oliver came up first but he /gasp par boils them first!  Wedges are supposed to be simple and oven cooked.  You might as well make roasties if you're going to parboil them.  Then I stumbled upon a student recipe website: http://studentrecipes.com/recipes/party-foods/potato-wedges/

Makes...loads!

Ingredients:

Potatoes (I happened to have King Edwards and they worked well)
Extra Virgin Olive Oil (this was the only Olive oil in my house)
4 sprigs of fresh Rosemary, stalks removed
8 cloves of fresh Garlic, squashed, deskinned and roughly chopped
Plenty of Salt and freshly ground Black Pepper

Method:

1. Wash the potatoes and cut into wedges.  I do this by halving them lengthways (biggest surface area as possible) then quartering each half lengthways (8 wedges per large potato).  The potatoes were extremely starchy so I soaked them in cold water.

Cold bath

2. Drain the potatoes.  Meanwhile get a large baking tray/roasting tin and drizzle oil on the base.  Apply half the rosemary and garlic bits.  Place the potato wedges evenly in one layer as possible.  Liberally apply salt and pepper.  Sprinkle the rest of the rosemary and garlic and slug more oil on top.


3. Cook at 200C for 40 mins.  I turned them over halfway.

Serve with lemon mayonnaise.

Review:
Hmmm, these were really good!  I ate waaaaay too many.  Minor improvements would be more even cooking which would require uniform potatoes.  I did have some parts of the tray with more oil than other parts.  I think the wedges would benefit from a proper tossing in the oil and seasonings!
Note to self:  Make these instead of roast potatoes for Christmas because they were so much more simpler to make and tastier too!

Saturday, 13 October 2012

Orange Cupcakes with Vanilla Buttercream


My good friend Takeshi bought some Orange Extract for my birthday!  I thought it was about time I used it so what better occasion then for his birthday!
I think Chocolate and Orange is a perfect combination.  I had baked Chocolate Cupcakes with Chocolate Buttercream the week before so was a bit chocolated out.  I had read on the Orange Extract bottle that Vanilla goes well with Orange.

The bonus about these cakes is that not only do they taste great but they are dairy-free!  It does contain egg so aren't Vegan.

I looked up fairy cake recipes and used this one as my basic recipe.  I bought some Billington's Natural Golden Icing Sugar but it had no recipe on the back.  It did mention a site called http://www.bakingmad.com so I had a look through the buttercream recipes and settled on this one: Basic Buttercream because it was simple and used the smallest quantity of the fat compared to the other recipes.

Makes 12 Cakes

Ingredients:

125g Pure Sunflower Spread
125g caster sugar
2 eggs, lightly beaten
2 tsp orange extract
125g self raising flour
2 tbsp Alpro Soy Milk (I happened to use the UHT red, any will do)
A pinch of salt

1.  In a bowl, beat the spread and sugar until fluffy.  I used a wooden spoon.

2.  Pour the beaten egg slowly from a measuring jug and beat in.  Add the orange extract and pinch of salt.

3.  Sift in half the flour and fold into the mixture.

4.  Add the soymilk (put in the eggless measuring jug for easy pouring, you might need more or less depending on the consistency).

5.  Put your fan oven on now!  180 - 190.

6.  Line your cake tin with cases.  Spoon mixture into tin and whack the tin downwards so the mix settles into the cases.  (Don't be overzealous, you want the cake mixture IN the cake tin/cases not on the ceiling.)


7.  Bake for 10-15 mins until risen and golden.


8.  Allow to cool for ten minutes before removing from the tin.  Allow to fully cool before any attempt on icing.


I took this out about 12 mins.  Light and fluffy!

For the icing:

50g Pure Sunflower Spread
200g Billington's Icing Sugar
1tsp Vanilla Extract (or to your taste)

Decorations:

Always check the ingredients each time.  I chose these because they are Vegetarian.  The slices contain egg.

Soft Gold Pearls for the eyes
Orange Slices for the mouth I just ate the lemon ones, yum yum :D

1.  Put the spread into a bowl.  Beat it until soft.  Slowly sift in the icing sugar and stir.  Repeat until the icing sugar is mixed in.  Add your flavouring.


2.  I put some boiled water into a cup and swirled it around to cool it down.  I'm thinking hot water isn't just boiled.  I didn't want my icing sugar to dissolve into a runny liquid.  Add enough for a good consistency.


3.  Put your face on!


Review:

These made me smile!  They tasted really good.  The icing tasted toffee-like.  Probably the best cakes I've made so far :)
If I never told you they didn't contain dairy, you would never know ;)
Smiles all round!


Monday, 9 April 2012

Cherry and Almond Muffins


I've tried the new Almond Milk by Alpro (check out my review here) and wanted to use it up.  I think cherry and almond go well together, think Bakewell Tarts.  I love cherries so I looked up some Cherry and Almond muffin recipes.  This recipe came about using the muffin recipe I use with some inspiration from bbcgoodfood.com and www.pastryaffair.com .  The latter is in cups but they use flaked almonds on top whereas the bbc recipe uses ground almonds and is metric.  I omitted the vanilla flavouring to keep the flavours clean and simple.  You could add some almond extract but I didn't because I don't bake often so wouldn't use much.

The best thing about using the almond milk is that people who don't eat soya can eat these muffins!

Makes 12 Muffins 

Ingredients:

300g self raising flour
100g golden granulated sugar
1tsp baking powder
1 pinch of salt
50g ground almonds
200g cherries (leave 6 whole or 12 halves to one side) chopped

175ml almond milk
125 corn oil
1 egg
50g flaked almonds
(6 cherries you left to one side)


Don't forget the muffin cases!

Method:

I just bought 100g flaked almonds and had a mini workout with the pestle and mortar.


1. Sieve the flour into a bowl.  Add baking powder, sugar, salt and 50g ground almonds and stir thoroughly.

2. In a mixing jug, pour in the milk and oil.  In a small bowl, break the egg and whisk.  Add egg to jug mixture.


3. Add the chopped cherries to the flour mixture.

4. Preheat fan oven 170.

Pour the liquid into the flour bowl.

5.
Spoon mixture into cases
6.
Top with flaked almonds and a halved cherry.
7.
Bake for 20-25mins.
8.
Delicious!

Review:

These looked amazing!  The cherry on top had baked to a chewy toffee.  It wasn't unpleasant but I might put the cherry on after the muffins have baked.  The toasted almonds had a lovely taste and texture.  The muffin was very crumbly on the bottom.  I think this may be due to the small egg.  I will put more liquid in next time.  They were very delicately flavoured.  My mother really enjoyed these and said they weren't too sweet.  My favourite bits were the chopped cherries and the toasted almond flakes on top.  These are really simple to make but look ever so special.  They also freeze well.

There isn't much washing up to do either!

Sunday, 4 March 2012

Baked Sweet Potatoes

Hello.  I am still cooking but I just haven't been blogging as of late.  I've been a bit Lidl happy lately; have a look here

I've had baked sweet potatoes before.  It's amazing how vibrant the soft sweet flesh is concealed within the unassuming skin.  I looked at a few recipes and then added some extra time.


Serves 4

Ingredients:

4 Sweet Potatoes!

Method:

1.  Preheat oven to 190 C.  I would advise that you have lined the bottom of your oven with some tin foil or use a tray/put a tray underneath. 

2.  Pierce each potato all over with a fork.  Wrap each potato with enough tin foil to cover.

All dressed up!

3.  Place in oven for 1hr-1hr 15 mins.  I have a potato rack so I thought I'd test it out.  This is where the tray comes in.  The potatoes will release a lot of sugars and they will burn and it will be a nightmare to clean up. 


4.  Serve


With butter and plenty of black pepper.


Review:

These were very soft and sweet.  I think freshly ground black pepper is the perfect accompaniment with it.  You can also have it with cheese or butter as well.  They really fill you up and they are far from mundane.